Questoris Knight No-Drill Magnetization Kit
Couldn't load pickup availability
Recommended


Complete No-Drill Magnetization Kit for Imperial Knights & Questoris Variants (Canis Rex & Defender)
This premium engineered magnetization system includes 40 precision-sized N52 magnets plus 9 custom 3D-printed sprues with 40+ proprietary components designed specifically for all Imperial Knight Questoris variants: Knight Paladin, Knight Errant, Knight Warden, Knight Crusader, Knight Gallant, Canis Rex, and Defender. Perfect for Warhammer 40k players who want maximum weapon loadout flexibility without drilling.
Why This Kit Saves You Hours of Work
Unlike DIY magnetization that requires extensive drilling, measuring, putty work, and trial-and-error fitting, this kit provides custom-engineered mounting solutions that eliminate drilling entirely. Our precision 3D-printed components include armpit guides, bicep rings, head clamps, weapon pivots, missile pod guides, and specialized mounting brackets that snap into place with magnets. This professional-grade system saves 4-6 hours of magnetization work while delivering superior quality and strength.
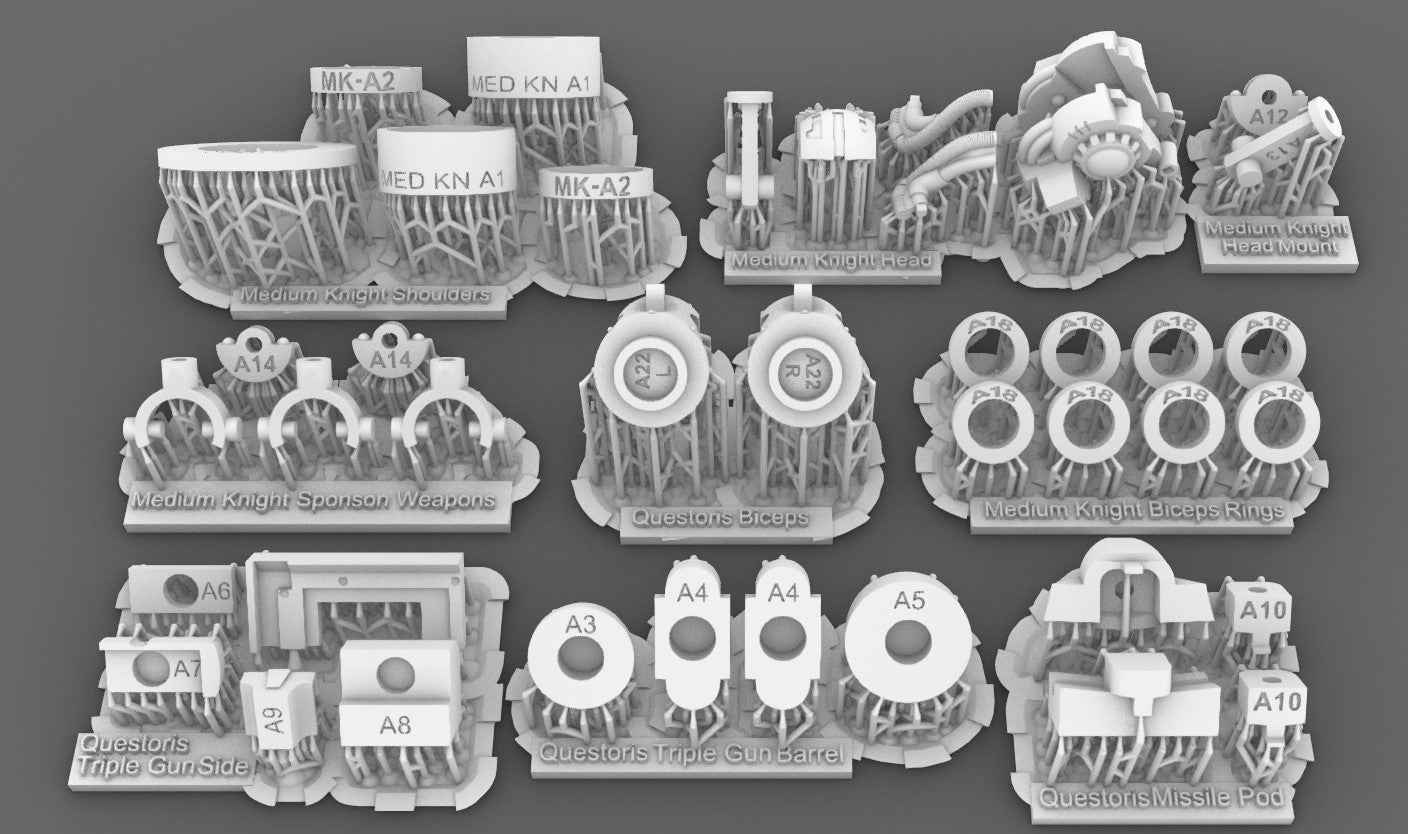
Custom 3D-Printed Components Included
The kit includes 9 sprues of custom-designed components:
- Shoulder & Arm System: Armpit guides, bicep rings, and elbow joints for perfect arm articulation
- Weapon Mounting: Multi-gun barrel plugs, side detail mounts, and weapon pivots for all loadout options
- Head Assembly: Head clamps, pivot mounts, face shields, and hose guides for full head customization
- Carapace Weapons: Missile pod guides, weapon clamps, and mounting systems for all top weapons
- Torso Weapons: Sponson weapon mounts and gun clamps
Compatible with All Questoris Knight Variants
Whether you're building a Knight Paladin, Errant, Warden, Crusader, Gallant, Canis Rex, or Defender, this kit provides everything you need to magnetize all weapon options and arm assemblies. Swap between battle cannon, thermal cannon, rapid-fire battle cannon, avenger gatling cannon, and all melee weapon configurations with ease.
No-Drill Installation — Professional Results
Our innovative no-drill design means you can magnetize your Imperial Knight without any drilling, measuring, or putty work. The custom 3D-printed components are precision-engineered to fit perfectly with GW plastic parts. Simply follow the comprehensive illustrated instructions to install the mounting system. Perfect for hobbyists of all skill levels — from beginners to veterans.
Maximum Weapon Flexibility
Magnetize all weapon options including:
- All arm weapons (battle cannon, thermal cannon, rapid-fire battle cannon, avenger gatling cannon)
- All melee weapons (reaper chainsword, thunderstrike gauntlet, titanic feet)
- Carapace weapons (twin Icarus autocannon, Ironstorm missile pod, Stormspear rocket pod)
- Head and shoulder options for full customization
- Waist joint for posing flexibility
Premium N52 Neodymium Magnets
All 40 magnets are N52 grade neodymium — the strongest commercially available rare earth magnets. Precision-sized in six different dimensions (2mm–12mm) to match each mounting point perfectly. Your weapon options will stay securely attached during gameplay and transport while remaining easy to swap between battles.
Perfect for Tournament Play
Magnetizing your Imperial Knight allows you to adapt your loadout for different opponents and missions. Build your list for competitive play without needing multiple models. The superior quality of this engineered system ensures weapons stay locked in place during intense games.
Kit Contents
40 precision-sized N52 neodymium magnets: 12x 2mm×2mm, 4x 4mm×1.5mm, 8x 5mm×3mm, 10x 6mm×2mm, 1x 10mm×3mm, 1x 12mm×2mm, 4x 12mm×3mm
9 custom 3D-printed sprues with 40+ components: Armpit guides, bicep rings, head mounts, weapon pivots, missile pod guides, barrel plugs, side detail mounts, shield pivots, and specialized mounting brackets
Comprehensive illustrated instructions: Step-by-step guide with detailed photos from every angle
___________________________
For the Dominus Knight kit click here.
For the Cerastus Knights, click here.
For the Armiger and War Dog kit, click here.
For the Chaos Knight Ruinator kit, click here.
For the Knight Destrier (Bellatus) kit, click here.