Chaos Knight Ruinator Custom No-Drill Magnetization Kit
Couldn't load pickup availability
Recommended


Complete No-Drill Magnetization Kit for the Chaos Knight Ruinator, Abominant, Desecrator & Rampager
Magnetize your entire Chaos Knight Ruinator box with zero drilling, zero putty work, and zero guesswork. This no-drill magnetization kit gives you full weapon-swap flexibility across all four Chaos Knight variants that can be built from the kit: the Knight Ruinator, Knight Abominant, Knight Rampager, and Knight Desecrator.
One box of plastic, four different Knights, and with this kit you never have to commit to a single build. Swap between every weapon and head configuration before each game to field whichever variant your list demands.
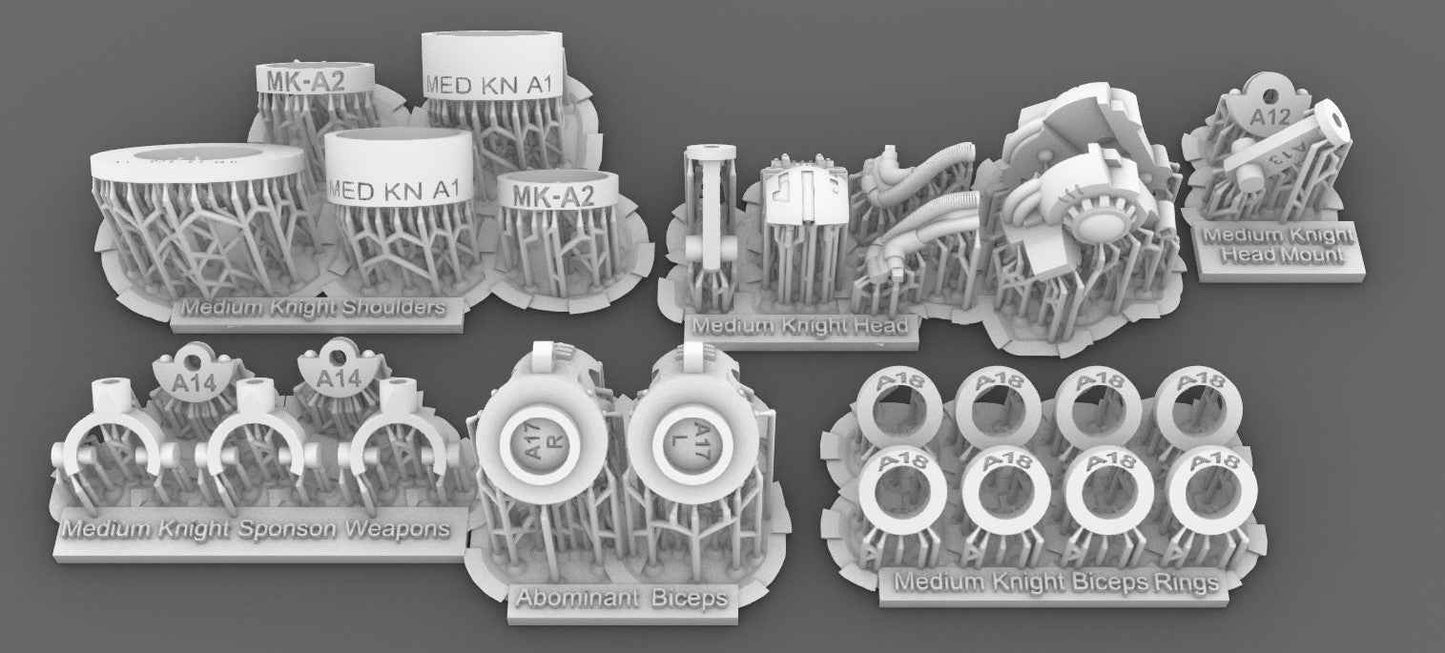
What You Can Magnetize
Knight Ruinator — Darkflame lance, fellbore, and terrorpulse missile launchers
Knight Abominant — Volkite combustor, balemace, electroscurge, and diabolus heavy stubber
Knight Rampager — Reaper chainsword, warpstrike claw, and diabolus heavy stubber
Knight Desecrator — Desecrator laser destructor, diabolus heavy stubber, and a choice of reaper chainsword or warpstrike claw
Plus swappable heads, faceplates, carapace details, and torso-to-leg separation for easy transport and storage.
What's in the Kit
This professional-grade magnetization system includes precision-sized N52 neodymium magnets — the strongest commercially available rare earth magnets — plus custom 3D-printed mounting sprues engineered specifically for the Chaos Knight chassis. Every 3D-printed component features alphanumeric part codes for easy identification during assembly.
Our custom-engineered mounting solutions create precise magnet seats that eliminate drilling entirely. The 3D-printed components snap into place and align every magnet perfectly. Weapons stay locked during gameplay and transport but pop off easily when you want to change loadouts between battles.
Why No-Drill?
Traditional Chaos Knight magnetization requires a pin vise, multiple drill bit sizes, green stuff, and hours of careful measuring — with constant risk of drilling through thin plastic or misaligning magnet poles. Our engineered system eliminates all of that. Just clip parts from their sprues, sand, glue, and magnetize. This kit saves 4-6 hours compared to DIY magnetization and delivers a superior fit every time.
What You'll Need
Super glue (we recommend our Maxi-Cure Plus), clippers, and needle files. Our Magnicator tools are strongly recommended for keeping magnet polarity straight during assembly.
Compatible With: Chaos Knights: Chaos Knight Ruinator plastic kit by Games Workshop (builds Ruinator, Abominant, Desecrator, and Rampager)
Click here for detailed step-by-step magnetization instructions, or follow the QR code on your magnets.
Other Knight Magnetization Kits
For the Despoiler, Questoris Knight (Paladin, Errant, Warden, Crusader, Gallant, Canis Rex, Defender), click here. For the Dominus Knight (Castellan, Valiant, Tyrant), click here. For the Cerastus Knight (Lancer, Acheron, Castigator), click here. For the Knight Destrier (Bellatus class), click here. For the Armiger and War Dog kit, click here.
Join our Discord for magnetization help and to share your projects!
PROP 65 WARNING
WARNING: This product contains a chemical known to the State of California to cause cancer.