
Pallas Grav-attack Magnetization Guide
Full guide
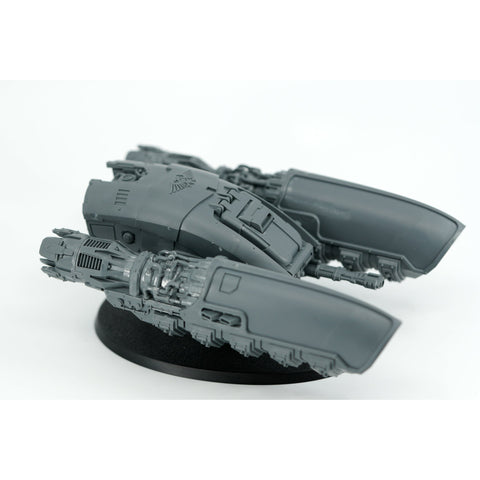
This article explains how to magnetize the Pallas Grav-attack model using our magnetization kit. You will be able to use the end model as any of the Twin Iliastus Accelerator Fusil and Twin Arachnus Blaze Cannon weapon options available in that box.
Please follow the normal assembly instructions that come with the plastic kit; the steps below cover only the magnetization.
To keep track of magnet polarity we use a set of Magnicator tools. We refer to a magnet's polarity as "red" or "blue," after the Magnicator end that is attracted to that magnet's surface. If you do not have those tools, use another method to track polarity, for example mark one face of a large spare magnet and reference it every time you place a magnet.
This guide will take you through step-by-step instructions for magnetizing your golden go-kart, I mean Pallas Grav-attack tank.

The kit comes with a set of 8 magnets and 2 flight stand components.
Magnets
| Diameter (mm) | Thickness (mm) | # |
|---|---|---|
| 3 | 2 | 2 |
| 4 | 2 | 2 |
| 4 | 4 | 2 |
| 8 | 2 | 1 |
| 10 | 2 | 1 |
| Total | 8 |
Flight Stand Components
| Component | # |
|---|---|
| Acrylic stand | 1 |
| Printed rock | 1 |
Tools For this guide you will need
- Pallas Grav-attack magnetization kit: every magnet and part this guide uses.
- Thick or gel super glue, such as Maxi-Cure Plus: glues each magnet in place without running the way thin CA glue does.
- Magnicators V2: show which face of a magnet is red or blue, so every pair attracts.
- Needle files or sandpaper: clean up a hole or socket so the magnet sits flush.
- Hobby knife or clippers: remove parts from the sprue and trim the areas the steps call out.
- Drill bits, 3mm, 4mm, and 8mm: the bit sizes the steps drill with.
- Small Hand Drill: holds bits from 1mm to 3mm and turns them by hand.
- Large Pin Vise: holds bits from 0.5mm to 8mm and turns them by hand.
- Drill Bit Small Metric Bundle: supplies the 1mm, 1.5mm, 2mm, 2.5mm, and 3mm bits.
- Drill Bit Medium Metric Bundle: supplies the 4mm, 5mm, and 6mm bits.
- Drill Bit Large Metric Bundle: supplies the 8mm, 10mm, and 12mm bits.
- Insta-set accelerant (optional): sets the super glue faster.
Step 1 Main Weapon Mounts
Magnets Used
| Size | # | Where |
|---|---|---|
| 4mm x 4mm | 2 | Lower weapon connection points on Part 1, left and right |
Model Parts
| Part | Part Number |
|---|---|
| Hull with weapon connection points | 1 |
| Side panels | 3 and 4 |
For this part of the guide, you will need to start at Manual Step 1A, but do NOT glue the side panels (Parts 3 & 4) to the floor of the tank. Not yet at least. Using your 4mm bit, drill into the lower connection point on Part 1 as shown below. You will drill completely through the plastic. Drill both sides to fit both left and right weapons.


Next, use the RED end of your Magnicator Tool to orient polarity, then with the flat end of your 4mm bit, insert and glue a 4mm x 4mm magnet into the holes you have just drilled.

Step 2 Flight Stand Conversion
Magnets Used
| Size | # | Where |
|---|---|---|
| 8mm x 2mm | 1 | End of the acrylic stand rod |
| 10mm x 2mm | 1 | Tank floor, over the drilled hole in Part 2 |
Flight Stand Components
| Component | # |
|---|---|
| Acrylic stand | 1 |
| Printed rock | 1 |
Model Parts
| Part | Part Number |
|---|---|
| Floor of the tank | 2 |
This kit includes a custom flight stand for the Pallas tank; this portion of the guide will instruct you on how to convert the tank to use the stand and magnetize the stand.

You will then need to drill the floor of the tank (through Part 2 after it has been glued in place) using your 8mm bit.

Once the floor has been drilled, you will use the RED end of your Magnicator Tool to glue a 10mm x 2mm disc magnet in place, covering the hole that you just drilled. This will act as a magnetic connection point for the included flight stand.


Once the 4mm x 4mm magnets and the 10mm x 2mm magnet are in place, you can complete the main hull build of the Pallas Grav-attack tank.
Next you will assemble the flight stand, gluing the printed 'rock' to the base in a location of your choosing. Then, glue the acrylic stand into the rock; make sure it sits level, otherwise the tank MAY lean.
You will then need to use the RED end of your Magnicator Tool to orient polarity of the 8mm x 2mm disc magnet, then using your needle file, score the face of the magnet to increase the chance of adhesion.

Once the magnet is scored, you can do the same to the end of the acrylic stand rod. Now carefully glue the 8mm x 2mm disc magnet as close to the center of the flight stand as you can. It doesn't have to be perfect, the magnets will not allow for wiggle room.

Step 3 Weapons
Magnets Used
| Size | # | Where |
|---|---|---|
| 3mm x 2mm | 2 | Twin Iliastus Accelerator Fusil, weapon / hull connection points |
| 4mm x 2mm | 2 | Twin Arachnus Blaze Cannons, weapon / hull connection points |
This step will guide you on how to make your 2 weapon options swappable.
First up, we will be magnetizing the Twin Iliastus Accelerator Fusil. This part can be done before or after you build the full weapon as it's made of multiple parts.
Using your 3mm bit, drill into the center of the weapon / hull connection point. You will only need to drill 2mm deep; you can use stop collars, tape or, if you are comfortable enough, just eyeball the depth and check using one of the included 3mm x 2mm magnets. Drill both Fusil weapons in this manner.


Next use the BLUE end of your Magnicator Tool to orient polarity of a 3mm x 2mm magnet, then using the flat end of your 4mm drill bit, glue and insert a magnet into either of the drilled holes; make sure the flat end of the bit sits flush.


You will next use your 4mm bit to drill in a similar location on the Twin Arachnus Blaze Cannons, drilling to a depth of 2mm.


Finally, using the flat end of your 4mm bit again, insert and glue a 4mm x 2mm magnet into the cannons, making sure the bit is flush.


Now your little golden chariot is ready to scoot across the battlefield, doing the Emperor's will.

Full guide