
Custodian Dreadnought Magnetization Kit Guide
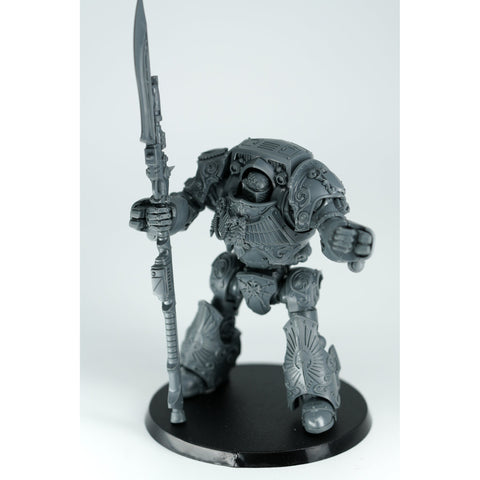
This Guide will take you step by step through magnetizing your Custodian Dreadnought, allowing you to swap between the Spear Oriented Contemptor-Achillus and the Sword Bearing Contemptor-Galatus.
For this Guide you will need:
-
- Custodian Dreadnought Magnetization Kit
- Hobby Knife
- Hobby Snips
- Needle File (Broad Face)
- Super Glue
- Magnicator Tool
- 2.5mm Drill Bit
- 3mm Drill Bit
- 6mm Drill Bit
- Large Pin Vise (0.5 - 8mm)
This guide uses (6) 6 x 1mm disc magnets and (16) 2.5 x 1mm disc magnets.
Step 1: Magnetizing the elbows
This portion of the guide will go over how to modify and magnetize the elbows of the Dreadnought to allow it to swap between forearm options. You will be using (2) 6 x 1mm disc magnets.
- First you will need to build the dreadnought arms up until Instruction Manual Step 64B.

- You will need to use your 6mm bit to gently drill into the center of either elbow, removing just enough material that a 6 x 1mm disc magnet can sit flush within that space.


- Once you have drilled both elbows, you will use your needle file to score the face of the magnet that will be glued in place.
Then use the BLUE end of your Magnicator Tool to glue and insert a 6 x 1mm disc magnet into that now drilled area.

Step 2: Magnetizing the 2 Pairs of forearms
For this step you will be using (4) 6 x 1mm disc magnets to magnetize the forearm connection points.
- Each forearm connection will have 2 small pre-moulded brackets within. You will need to carefully clip and trim them down to allow a 6 x 1mm disc magnet to fit comfortably.

- Once you have trimmed these brackets down, each forearm interior should look similar to the picture below. You will need to do a dry fitting to make sure the magnet CAN fit within.

- After dry fitting the magnet, use the RED end of your Magnicator Tool to orient polarity on a 6 x 1mm disc magnet, then score the face using the needle file again.

- Using the flat end of your 2.5mm bit, glue and insert the 6 x 1mm disc magnet into the forearm interior.


Repeat this process for all 4 forearms.
Step 3: Magnetizing Forearms
This portion of the guide will show you how to modify and magnetize the back of the forearm and front of the wrist to make all weapons for the Achillus Dreadnought swappable.
- You will first need to clip and remove the raised mounting brackets on each forearm part.


- Once they have been removed, you will use your 2.5mm bit to drill into the back of the forearm, approximately 1mm deep. You can use a 2.5 x 1mm disc magnet as a depth gauge by dry fitting it as you go. The magnet will need to sit flush.


- Next you will use the BLUE end of your Magnicator Tool to orient polarity, score the face of the magnet with the needle file, then glue and insert a 2.5 x 1mm magnet into the back of the forearm.


Once the back of the forearm is magnetized, you will use your 2.5mm bit to gently drill into the front of the wrist. You will need to do this in an L shape, first lightly drilling against the interior of the wrist cowl.
Then drill horizontally towards the back of the forearm, again using a 2.5mm magnet as a depth gauge by dry fitting. You will want the magnet to sit flush.

- Once you have drilled each part this way, use the BLUE end of your Magnicator Tool to orient polarity of a 2.5 x 1mm magnet, then with your needle file, score the face of the magnet.
Then again with the flat end of your 2.5mm bit, glue and insert the 2.5 x 1mm magnet into the drilled wrist cowl.
Step 4: Magnetizing the Wrist Weapons
This final step of the guide will have you drill and magnetize the 4 weapon options
- You will need to assemble all weapon barrel options as shown in the Instruction Manual (Steps 72 A/B/C and 75 A/B/C) but do NOT glue the ammo or barrels to the forearm.
After each barrel pair has been assembled, use your 2.5mm bit and drill in a similar L shape, like you did with the forearm wrist cowl. Only drill about 1mm deep (use the magnet depth gauge method).


- Next, use the RED end of your Magnicator Tool to orient polarity of a 2.5 x 1mm magnet, then use the flat end of your 3mm bit to glue and insert the magnet into the drilled space, making sure the magnet is facing horizontally. Repeat this process with ALL barrel options.


- Lastly, use your 2.5mm bit to drill into the underside of the ammo packs, again only drilling deep enough for a 1mm magnet to sit flush.


- Using the RED end of your Magnicator Tool, orient polarity of a 2.5 x 1mm magnet, glue and insert it into the drilled hole, making sure the magnet is flush. Repeat this process for ALL ammo packs.


Now your Custodians are able to freely swap between weapon options as they clean the battlefield of all of the Emperor's foes.
